

Available on: all plans (Starter, Growth, Scale and Enterprise). Connecting your calendar account for live booking updates needs the Growth plan and above.
- Book calls inside your funnel. The booking popup opens right after the form is submitted, so the lead is saved even if the visitor does not book.
- See who booked. Your leads table gets an Appointment column with a status dot: Booked, Rescheduled or Cancelled.
- Open and track the booking from the lead. With your calendar connected, the Appointment column shows the date and time, and clicking it opens the booking page on Calendly or Cal.com, where you can reschedule or cancel. AskFunnel also updates the lead when a visitor reschedules or cancels.
- A booking link from Calendly or Cal.com, for example the link of one event type. Create it in your calendar tool first.
- A form that asks for an email or a phone number. A booking is attached to a lead, and AskFunnel only saves a lead when one of them is given. See Set up your lead capture form.
Important to note
Setup
1
Add your booking link to the form
- Open your funnel in the builder and go to the page with your lead form.
- Click the form. Its settings panel opens.
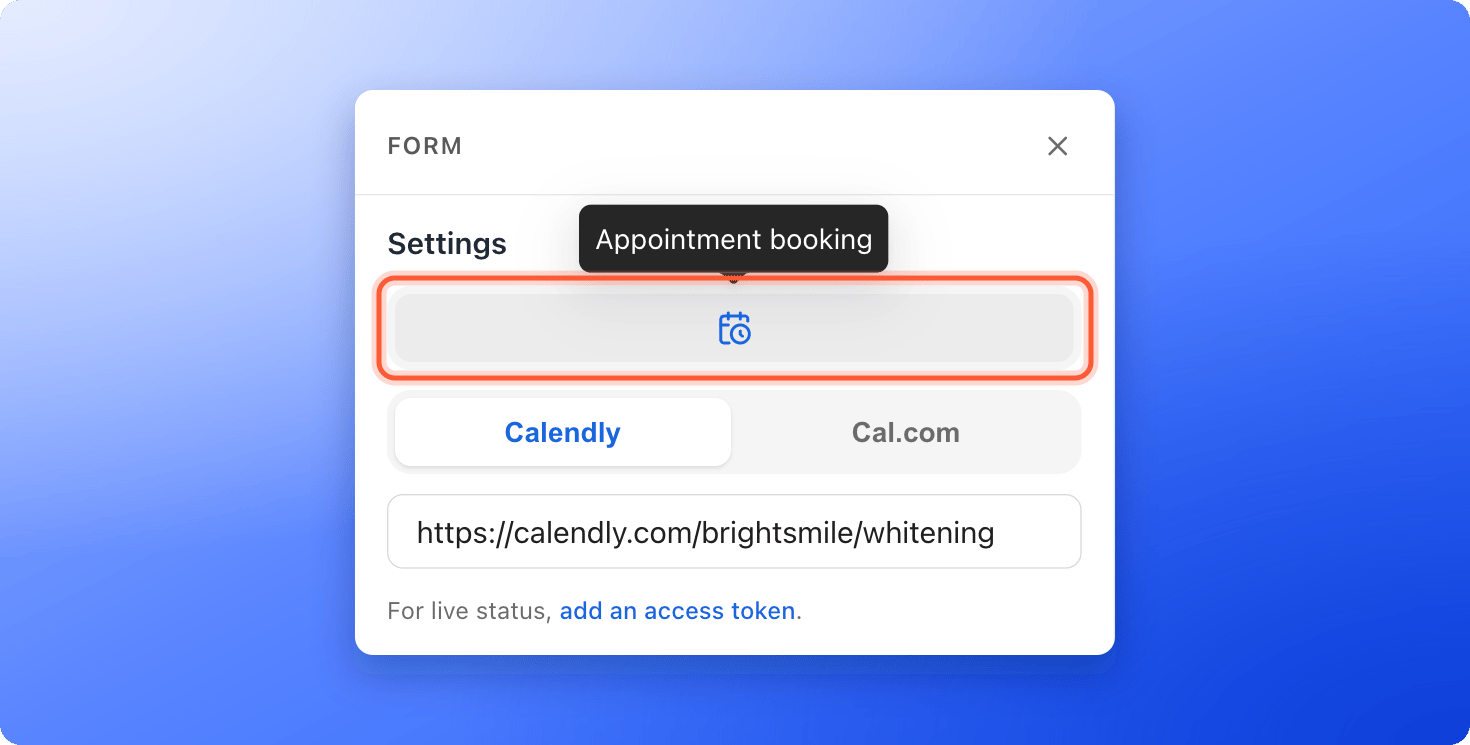
- Under Settings, click the calendar icon to turn on Appointment booking. Hover over the icon to see its name.
- Choose Calendly or Cal.com.
- Paste your event link, for example calendly.com/summit-realty/home-tour or cal.com/summit-realty/home-tour.
- Click “Publish Funnel” at the top right to make it live.
2
Test it as a visitor
- Open your published funnel and fill in the form. Click the submit button.
- The booking popup opens. Pick a time to book.
- In your leads table, find the lead. The Appointment column shows Booked.
3
Connect your calendar account (optional)
This step needs the Growth plan or above and a Workspace Admin or Global Admin role. You connect a calendar once per workspace, and then every funnel in the workspace can use it. Calendly also needs a paid Calendly plan for live updates, because they rely on Calendly webhooks (automatic messages from Calendly to AskFunnel).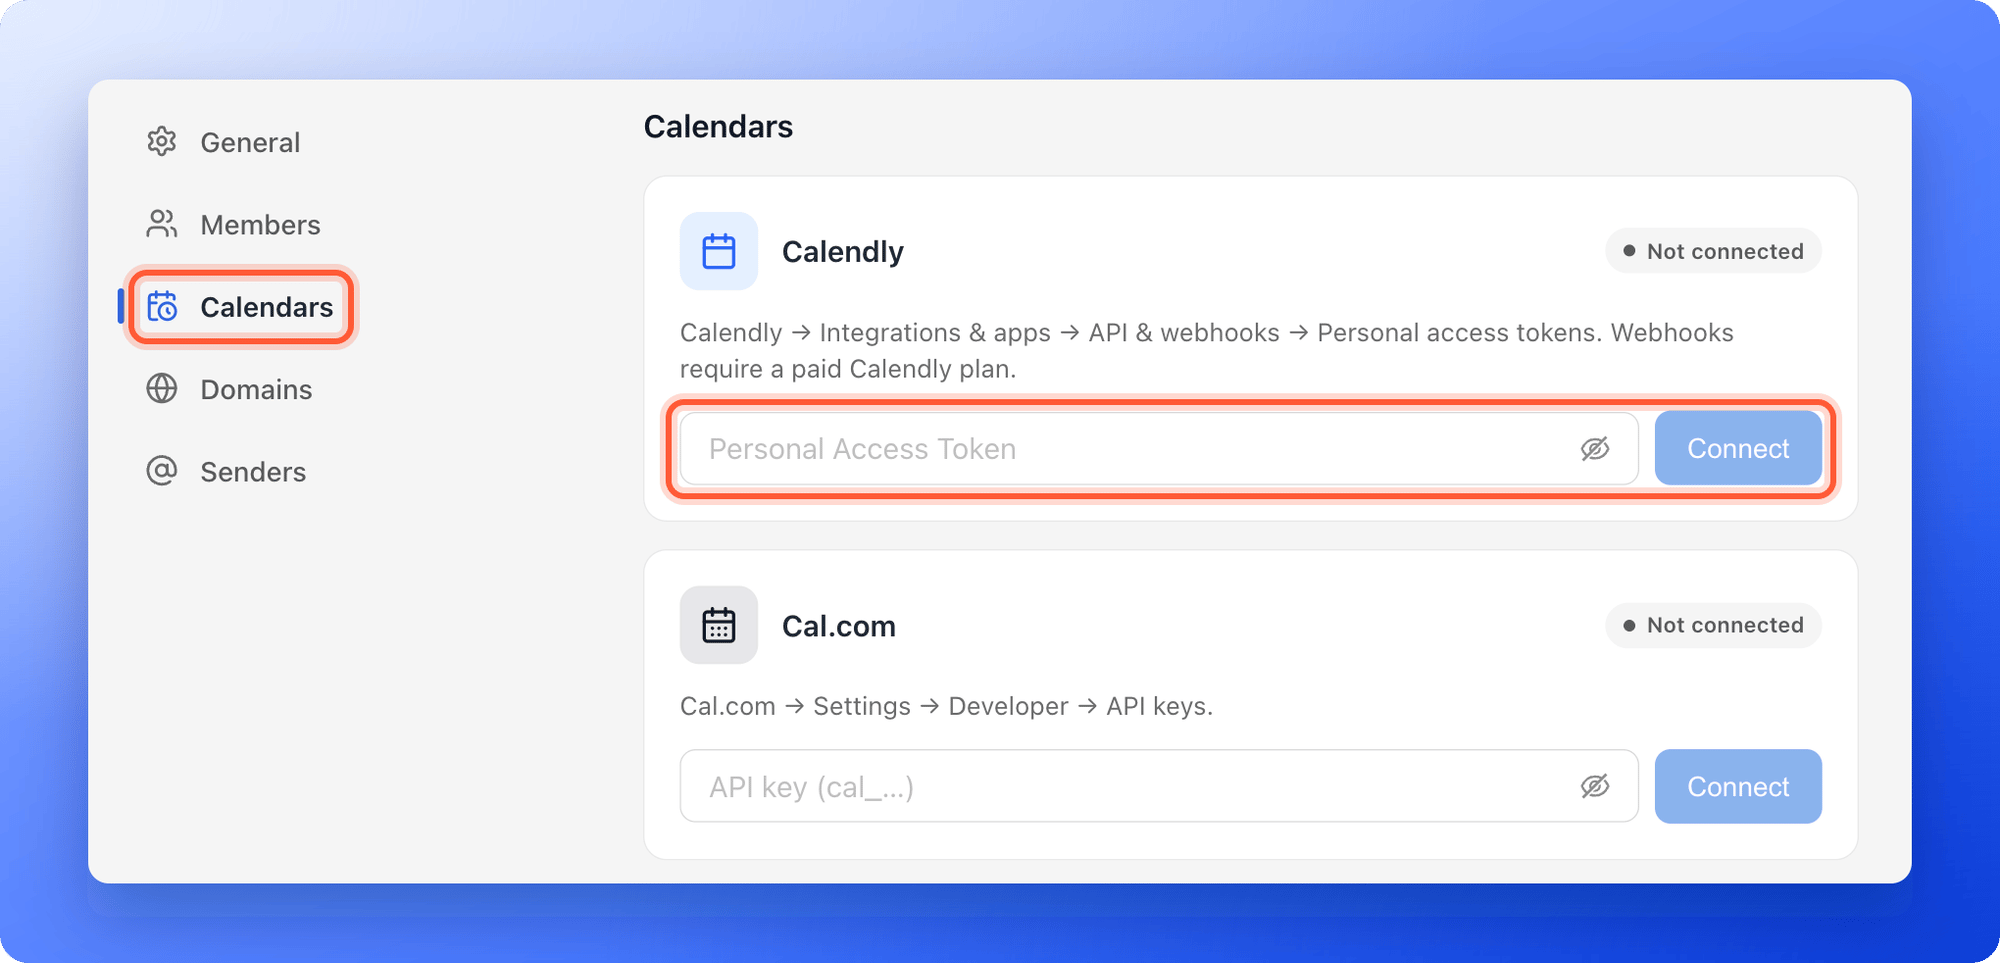
- On the Workspaces page, open the menu of your workspace and click “Workspace settings”.
- On the left side menu, click “Calendars”.
- Choose your calendar tool:
- Calendly: paste your Personal Access Token and click “Connect”. In Calendly, go to Integrations & apps, then API & webhooks, then Personal access tokens, and create one.
- Cal.com: paste your API key, which starts with cal_, and click “Connect”. In Cal.com, go to Settings, then Developer, then API keys, and create one.
- AskFunnel shows Calendly connected. or Cal.com connected., and the card shows Connected.
You can also connect from the form’s settings. Under the booking link, click add an access token (Calendly) or add an API key (Cal.com). Your token or key is checked with Calendly or Cal.com, stored encrypted and never shown again. AskFunnel uses it to set up a booking webhook on your account, so new bookings, reschedules and cancellations reach your leads.
How do I know it is working?
- In Workspace settings, then Calendars, the card of your calendar tool shows Connected.
- After a test booking, the lead’s Appointment column shows a green dot for Booked. With your calendar connected, it also shows the date and time.
- When you reschedule the booking in Calendly or Cal.com, the dot turns amber for Rescheduled. When you cancel, it turns red for Cancelled.
Troubleshooting
The booking popup does not open
The booking popup does not open
Check these, in order:
- Appointment booking is on, and a booking link is pasted. If the link is empty or cannot be used, the funnel moves on without the popup.
- You clicked “Publish Funnel” after changing the form.
- You are testing on the published funnel, and the popup opens after you submit the form, not when the page loads.
- Your browser or ad blocker is not blocking Calendly or Cal.com.
- The link is the link of a real event type. Open it in a new tab to check.
My token or API key was rejected
My token or API key was rejected
Calendly or Cal.com did not accept it. Create a new token in Integrations & apps, API & webhooks for Calendly, or Settings, Developer, API keys for Cal.com, then paste it and click “Connect” again.
I see Live calendar tracking is available on the Growth plan and above
I see Live calendar tracking is available on the Growth plan and above
Connecting your calendar account needs the Growth plan or above. Click “Upgrade to Growth” or see Upgrade your plan. Booking popups keep working on every plan.
The lead shows Booked but no date, or it does not update
The lead shows Booked but no date, or it does not update
The booking’s date and link need the Growth plan or above. With Calendly, they also need your calendar account to be connected. Updates for reschedules and cancellations need your account to be connected with either tool, and a paid plan if you use Calendly. Connect your account as described in Setup, then try a new booking.
A visitor booked, but I do not see the booking on the lead
A visitor booked, but I do not see the booking on the lead
Open the lead in your leads table and check the Appointment column. A visitor who only opened the popup and closed it has no booking. Their lead is saved without an appointment.
Manage the integration
- Change the booking link: open the form’s settings in the builder, edit the link and click “Publish Funnel”.
- Switch between Calendly and Cal.com: choose the other one in the form’s settings, paste its link and click “Publish Funnel”.
- Stop showing the popup: turn off Appointment booking in the form’s settings and click “Publish Funnel”.
- Disconnect your calendar account: in Workspace settings, then Calendars, click “Disconnect” on its card and confirm.
What to do next
Send leads to HighLevel
Every new lead becomes a contact in HighLevel.
View and manage your leads
See each lead and its Appointment status.
Send automated emails to new leads
Confirm the call with a welcome email.