

- Choose what you ask. Pick from 15 field types, such as name, email, phone, date, dropdown, country and a consent checkbox.
- Set what is required. Every field is required by default, and you can make any field optional.
- Check answers as people type. Emails, phone numbers, websites, numbers and dates are checked before the form can be sent.
- Decide what happens next. Send people to the next page, to a specific page or result, or to your own website.
- A funnel open in the builder. See Launch your first funnel.
- A page for the form. This is usually the last page before your thank you screen. See Manage your funnel pages.
Important to note
Add and customize your form
1
Add the form to a page
- In the builder, open the page where you want the form.
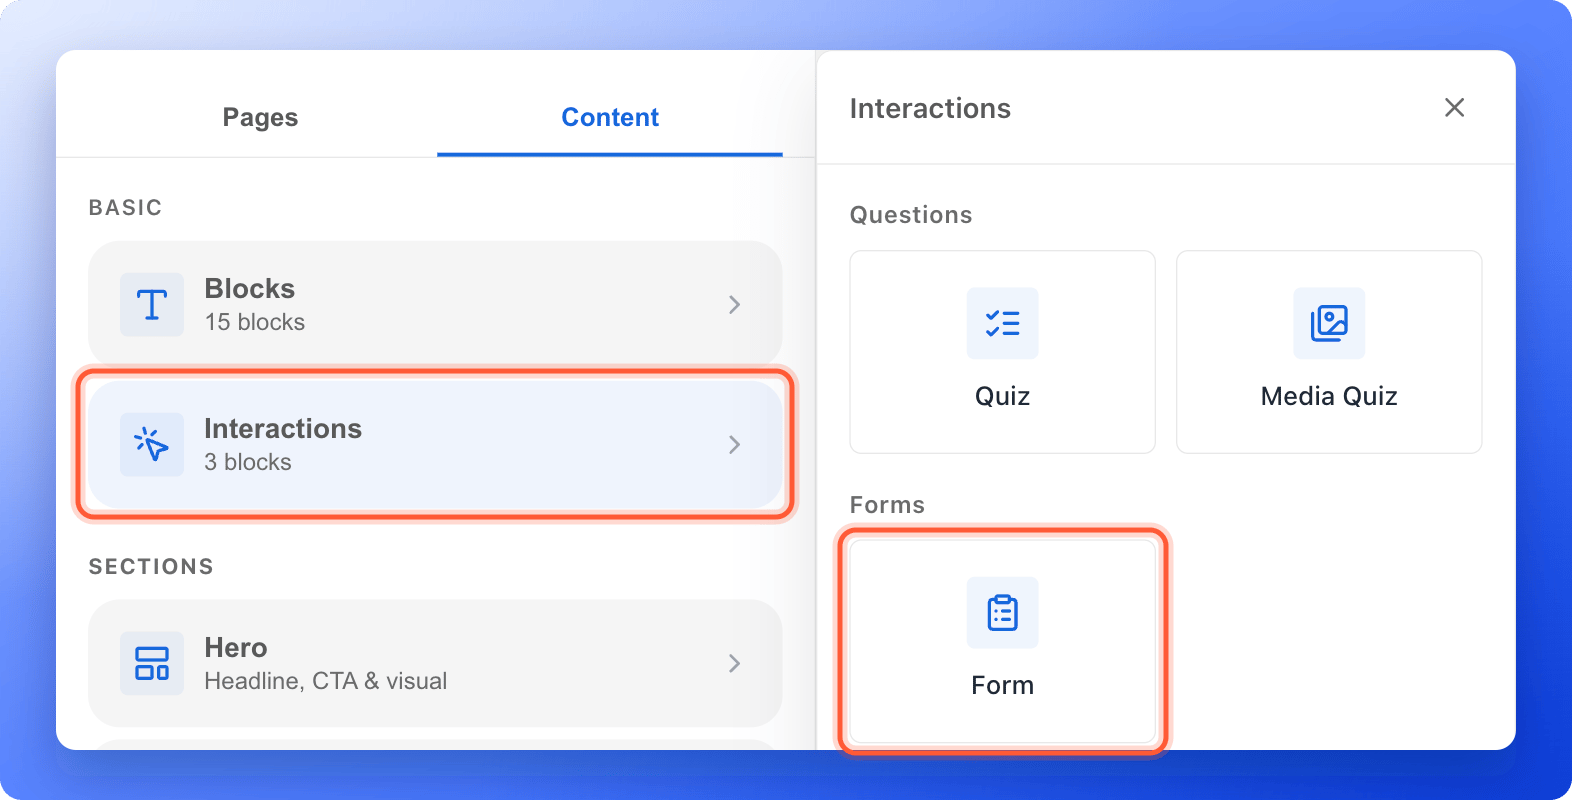
- Click the “Content” tab on the left side menu.
- Click “Interactions”, then click “Form” under Forms. The form is added to your page.
2
Write your heading and text
Click the heading at the top of the form and type your own, for example “Get your free home valuation”. Click the line under it and explain what happens next, for example “Enter your details and our team will call you within one business day.”A form holds up to 2 lines of text, such as a heading and a subheading, and one button.
3
Choose your fields
A form holds 1 to 8 fields.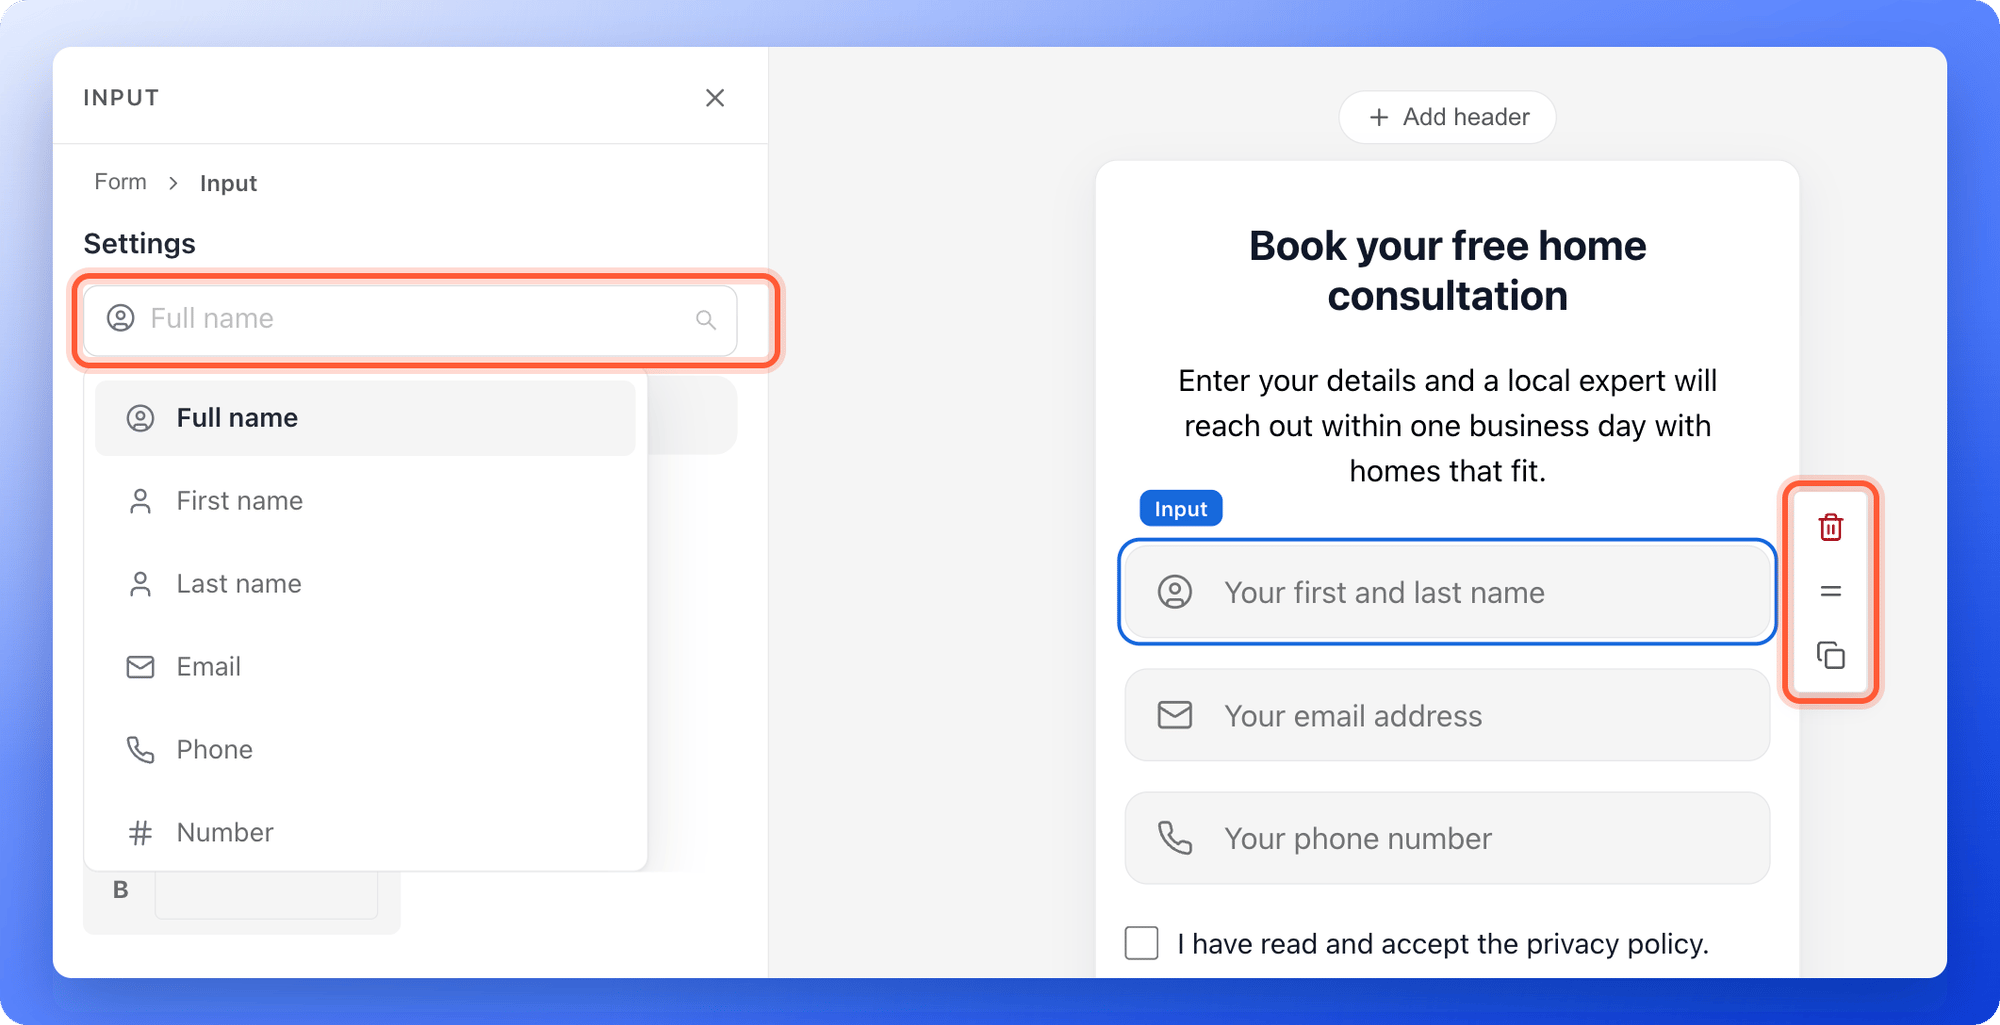
- Click a field to select it. A small toolbar appears at its right, and the left panel shows its settings.
- In the dropdown at the top of the left panel, choose the field type: Full name, First name, Last name, Email, Phone, Number, Custom, Message, Website, Date, Time, Birthday, Dropdown, Country or Consent.
- Turn the Required switch on or off. Turn it off for details you only want if the person is happy to share them.
- Click the gray text inside the field to change what it says, for example “Your mobile number”.
- To add a field, click the Duplicate icon on the toolbar and change the copy. To remove a field, click the trash icon. To reorder fields, drag the = icon.
4
Style your fields and button
- With a field selected, click the picture under Icon to choose a different icon or emoji. Under Color, B sets the background color of the field.
- Click the “Submit” button to select it, then click its text to change the label, for example “Get my valuation”.
- Use the color swatch under Color to change the button color. Use the other controls to change the text size, make it Filled or Outline, or stretch it to the full width.
5
Choose where people go after they submit
The Action Flow setting decides where people go next.
- Click a field, then click “Form” in the path at the top of the left panel to select the whole form.
- Find Action Flow. While it is off, people go to the next page in your list, which is usually your thank you screen.
- To send them somewhere else, turn Action Flow on, click the summary under it, and choose Always goes to: Next Page, External URL (your own website), a specific page or a result. Click “Save”.
The submit button has no Action Flow of its own. The form decides where people go.
6
Publish your funnel
Click “Publish Funnel” at the top right to make your changes live.
How do I know it is working?
Test your form on the live page, not in the builder.- Open your live funnel. To get your link, see Share your funnel.
- Fill in the form with a test name and an email you can check, and click “Submit”.
- Click your funnel in the Funnels list to open its Leads tab. The test lead appears with its answers. See View and manage your leads.
Troubleshooting
My form says This is a required field
My form says This is a required field
That field is required and was left empty. Turn off Required for details that are optional. A required Consent checkbox shows Please accept to continue. until it is ticked.
My form says Please use your company email address
My form says Please use your company email address
Company emails only is on for the email field. Turn it off if you also want to accept addresses from providers such as Gmail.
I cannot add another field
I cannot add another field
A form can have up to 8 fields. Remove one first, or ask the rest of your questions in a quiz.
People land on the wrong page after they submit
People land on the wrong page after they submit
Select the form and check Action Flow. If it is off, people go to the next page in your page list. Reorder your pages, or turn Action Flow on and choose a page.
My test lead does not show up
My test lead does not show up
Check that you published your funnel and that you submitted the form on the live page, not in the builder. The test must include an email or a phone number, because a form with only a name does not create a lead. Then open the Leads tab and refresh it.
Settings for each field type
Some field types have extra settings in the left panel.- Phone: Country code selector shows a dial code picker and checks the number format. Default country chooses which code shows first. People can still change it.
- Email: Company emails only rejects free providers such as Gmail and Yahoo.
- Number: Minimum and Maximum limit the number a person can enter.
- Dropdown and Time: Choices holds your options, one per line. Allow multiple selections lets a person pick more than one option in a dropdown.
- Date: Allow past dates and Disable weekends limit the days a person can pick.
- Consent: a checkbox with text you write, for example “I agree to be contacted about my enquiry.” Click the text to edit it.
Book a call after the form
Turn on Appointment booking in the form settings to open a Calendly or Cal.com popup after the visitor submits. See Let visitors book a call.What to do next
Customize your thank you screen
Tell people what happens after they submit.
Share your funnel
Get your funnel link and send people to it.
View and manage your leads
See every lead with its answers.
Email new leads automatically
Send a welcome email the moment someone submits.